Microplate Centrifuges
Data Sheet
![]() Shop this product in our online store
Shop this product in our online store
Arrayit | Microarray microplate centrifuges 96-well 384-well plates benchtop design 110 220 volt life sciences research
Products - Microarray Instruments - Microarray Microplate Centrifuges
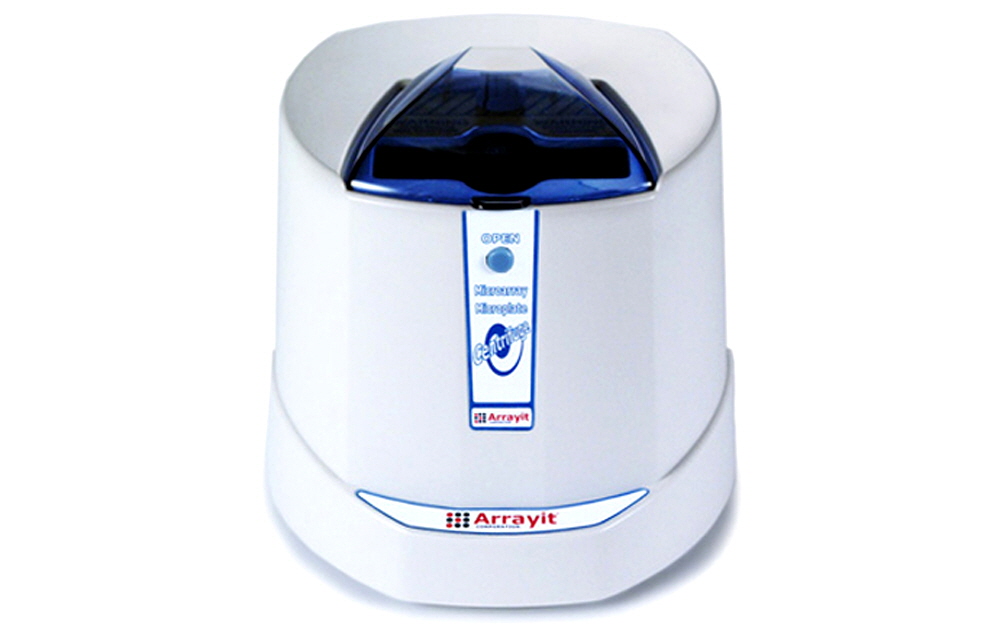
Arrayit introduces the market’s first desktop microplate centrifuges for microarray applications. Microarray Microplate Centrifuges in 110-volt and 220-volt versions offer high-performance 5,000 rpm and 1,500 x g centrifugation of 384-and 96-well microplates to consolidate aqueous samples into the well bottoms prior to microarray printing with SpotBot® 3 and NanoPrint™ Microarrayers. Highly recommended for all microarray, life sciences and diagnostics laboratories.
Table of Contents
Introduction
Quality Control
Product Description
Technical Assistance
Short Protocol
Complete Protocol
Troubleshooting Tips
Recommended Products
Ordering Information
Safety Information
Warranty
Introduction
Congratulations on taking an important step towards improving the economies of scale, quality and speed of your life sciences, medical, diagnostics and agricultural research. This booklet contains a complete set of protocols outlining the steps and principles needed to use Arrayit Microarray Microplate Centrifuges.
Quality Control
Arrayit ensures the performance of this product line. The finest scientific research was used to develop Arrayit Microarray Microplate Centrifuges. Rigorous quality control monitoring on a instrument-by-instrument basis guarantees that the manufacturing, performance and safety benchmarks exceed the highest industry standards.
Product Description
Arrayit Microarray Microplate Centrifuges has been designed and developed to rapidly and efficiently consolidate aqueous microarray samples into the bottoms of 384-well and 96-well microplates prior to microarray printing. Properly configured samples are essential for high quality microarray printing. Arrayit Microarray Microplate Centrifuge customers will appreciate the following product features:
- Maximum centrifugation speed of 5,000 revolutions per minute (5,000 rpm)
- Maximum centrifugal force of 1,500 times gravity (1,500 x g)
- Rotor capacity of 2 microplates
- Consolidates samples in well bottoms in less than 60 seconds
- Total centrifugation time of less than 90 seconds
- Spin samples of DNA, proteins, cell extracts, patients samples and more
- Market’s only personal microplate centrifuges
- Accommodates all standard 384-well and 96-well microplates
- Society for Biomolecular Screening (SBS) microplate format compliant
- Translucent blue dome allows easy viewing and prevents particulate contamination
- Intuitive power switch and dome release provide ease-of-operation
- Spring-loaded microplate guides ensure proper microplate positioning
- Compatible with foil seals to prevent sample evaporation during use
- Compatible with Variation Identification Platform (VIP) packages
- Compatible with all microarray cleanrooms
- Compliment entire Arrayit product line
- Highly affordable pricing
- Much quicker and more compact than standard centrifuges
- Saves valuable laboratory expense by reducing equipment costs and centrifugation times
- Low noise and vibration output improves laboratory environment
- Fixed angle vertical rotor provides greater user safety
- Flexible tensioners ensure proper microplate location during spins
- Essential instrument for all microarray laboratories
- General use instrument for life sciences, diagnostics, and healthcare laboratories
- Compatible with PCR plate centrifugation
- Available in 110 volt (U.S.) and 220 volt (international) models
- Accelerates from 0 rpm to 5,000 rpm in less than 30 seconds
- Decelerates from 5,000 rpm to 0 rpm in less than 25 seconds
- Compact size: 21 cm x 19 cm x 18 cm (L x W x H)
- Light weight construction: 1.6 kg
Technical Assistance
Please contact us if you have any comments, suggestions, or if you need technical assistance. By electronic mail: arrayit@arrayit.com (under the subject heading, please type Arrayit technical assistance). By email: arrayit@arrayit.com, Monday-Friday PST 9:00 AM-6:00 PM. Please remember that we want to hear about your successes!
Short Protocol (Steps 1-8)
1. Power up the Microarray Microplate Centrifuge by pressing the power switch.
2. Prepare two 384-well microplates containing 5-10 µl of sample per well.
3. Cover the microplate wells using a microplate lid or adhesive seal.
4. Load two microplates into the Microarray Microplate Centrifuge.
5. Close the translucent blue centrifuge dome to initiate centrifugation.
6. Centrifuge the microplates at 5,000 rpm for 60 seconds.
7. Press the “Open” button to terminate the centrifugation process.
8. Wait for the rotor to stop completely and remove both microplates.
Complete Protocol (Steps 1-8)
1. Power up the Microarray Microplate Centrifuge by pressing the power switch. Place the instrument on a laboratory bench with a minimum of 15 cm clearance on all sides to allow for proper operation. Make sure the translucent blue centrifuge dome is unlatched prior to powering on the instrument. Insert the instrument power cord into the three-prong connector located on the back of the instrument and insert the other end of the power cord into a certified 110 volt (US) or 220 volt (international) socket (Figure 1). Press the black “0-1” toggle switch on the back of the instrument into the “1” or “on” position (Figure 1). The unit is now ready for use.
2. Prepare two 384-well microplates containing 5-10 µl of sample per well. Use an automated liquid transfer robot, automatic pipette, manual pipet or other pipetting device to transfer 5-10 µl of liquid microarray sample into each well of a 384-well microplate. Microplates in a 96-well configuration may also be used. Arrayit Microarray Microplate Centrifuges are compatible with all SBS compliant microplates not exceeding 18 mm in total thickness including the microplate and plastic lid or adhesive seal.
3. Cover the microplate wells using a microplate lid or adhesive seal. After the samples are transferred into the microplate wells, tap the microplate on the laboratory bench several times to move the samples into the well bottoms. Cover each microplate with a plastic microplate lid or adhesive foil or plastic seal. If adhesive seals are used, make sure the seals are flush with the sides of the microplates are do not protrude excessively beyond the plate perimeter. Sealing the microplates prevents sample loss and the creation of aerosols during centrigation. Please do not spin unsealed microplates in the Microarray Microplate Centrifuge as this will lead to instrument contamination.
4. Load two microplates into the Microarray Microplate Centrifuge. After the microarray samples are transferred into the microplates and the plates are sealed, weight each microplate pair on a digital scale to ensure that the two microplates are similar in weight by ±0.5 grams. Microplates that differ in weight by more than 0.5 grams should not be spun in the instrument as this will lead to rotor imbalance and a potentially dangerous situation, as imbalanced centrifuges will vibrate violently and overturn in extreme situations. Please make sure to weigh all microplate pairs prior to use to ensure compliance by ±0.5 grams between plates. Open the blue translucent instrument lid and use the thumb screw on the top of the instrument to rotate the rotor into the proper loading position (Figure 2). The proper loading position centers the rectangular rotor slot at the front top of the instrument. Insert a sealed microplate into the rotor slot with the well bottoms facing outward and the plate lid or adhesive seal facing inward (Figure 3). The gray tensioner will compress and provide outward pressure to hold the microplate in position during centrifugation. Insert the microplate completely until it contacts the bottom of the rotor. A complete loaded microplate inserts below the top of the instrument housing by 0.5 cm. If adhesive clear or foil seals are used, make sure the seals are seated below the top of the instrument housing. Use the thumb screw on the top of the instrument to rotate the rotor into the proper loading position and insert the second microplate, using the same procedure used to load the first microplate. A properly loaded Microarray Microplate Centrifuge contains two sealed microplates with the well bottoms facing outward, balanced to ±0.5 grams.
5. Close the translucent blue centrifuge dome to initiate centrifugation. Wear laboratory approved safety glasses to protect your eyes during centrifugation. After both microplates are loaded, swing the hinged blue transleucent dome downwards and snap the dome into the closed position to initiate centrifugation. The rotor will gain speed quickly and reach 5,000 rpms within 30 seconds. Carefully inspect the instrument during the acceleration process to make sure the rotor is spinning smoothly and without vibration. The centrifugation process is readily visible through the blue dome (Figure 4). If instrument vibration, excessive noise or movement is observed, stop the rotor immediately by pressing the round “OPEN” button on the top front of the instrument. Re-weight the microplates and make sure the plates are weight-balanced to within ±0.5 grams before proceeding.
6. Centrifuge the microplates at 5,000 rpm for 60 seconds. Allow centrifugation to proceed for 60 seconds to completely consolidate the 5-10 µl aqueous microarray samples and sample droplets into the microwell bottoms. Sample consolidation greatly improves microarray printing efficiency by ensuring proper pin loading and preventing sample droplet formation on the pin shafts. Arrayit Microarray Microplate Centrifuges may also be used for other laboratory purposes such as sample consolidation following the polymerase chain reaction (PCR) process.
7. Press the “OPEN” button to terminate the centrifugation process. After the 60 second centrifugation step, termination centrifugation by pressing the “OPEN” button inward. Use two hands for this step, one hand to press the “Open” button inward and the other hand to hold the instrument in place (Figure 5). The rotor will decelerate from 5,000 rpm to 0 rpm in less than 25 seconds. Do not at any time open the instrument dome until the rotor has made a complete stop. Placing your hands inside a spinning rotor can cause serious personal injury and should be avoided under any and all circumstances.
8. Wait for the rotor to stop completely and remove both microplates. After pressing the “OPEN” button, the rotor will decelerate from 5,000 rpm to 0 rpm in less than 25 seconds. Please do not open the instrument dome until the rotor has made a complete stop, as placing your hands inside a spinning rotor can cause serious personal injury and should be avoided under any and all circumstances. Once the rotor has stopped completely, use the thumb screw on the top of the instrument to rotate the rotor into the proper unloading position. Remove the first microplate by lifting the plate upward and out of the instrument (Figure 6). Use the thumb screw on the top of the instrument once again to rotate the rotor into the proper unloading position and remove the second microplate. The centrifuged microplates are ready for microarray printing or other downstream applications. Close the translucent blue centrifuge dome gently to prevent particulates from accumulating in the rotor during non-use.
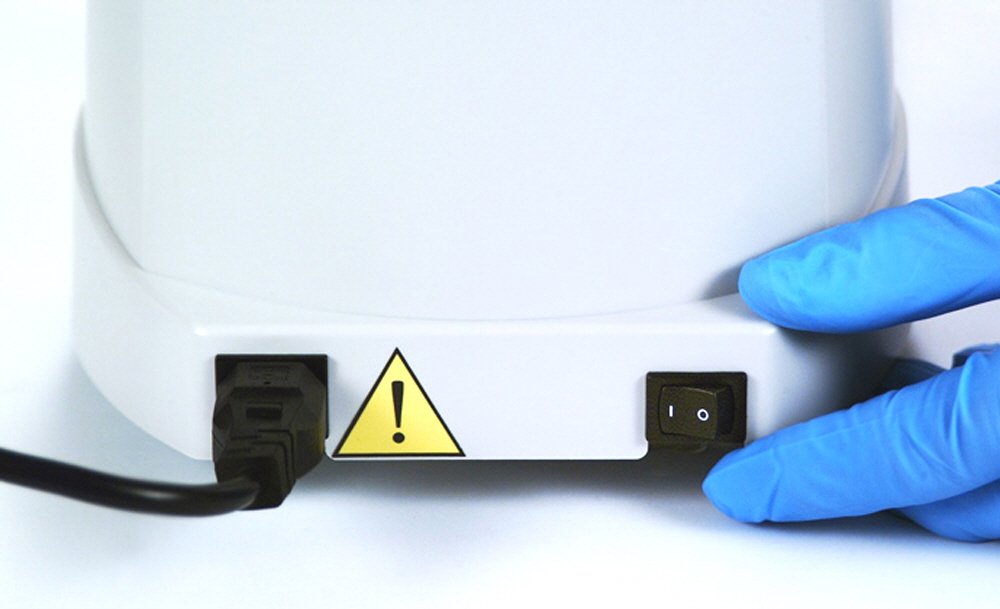
Figure 1. Arrayit Microarray Microplate Centrifuge (Cat. MPC110) instrument back panel with the power cord inserted into the 3-prong recepticle and the toggle switch in the “on” position.
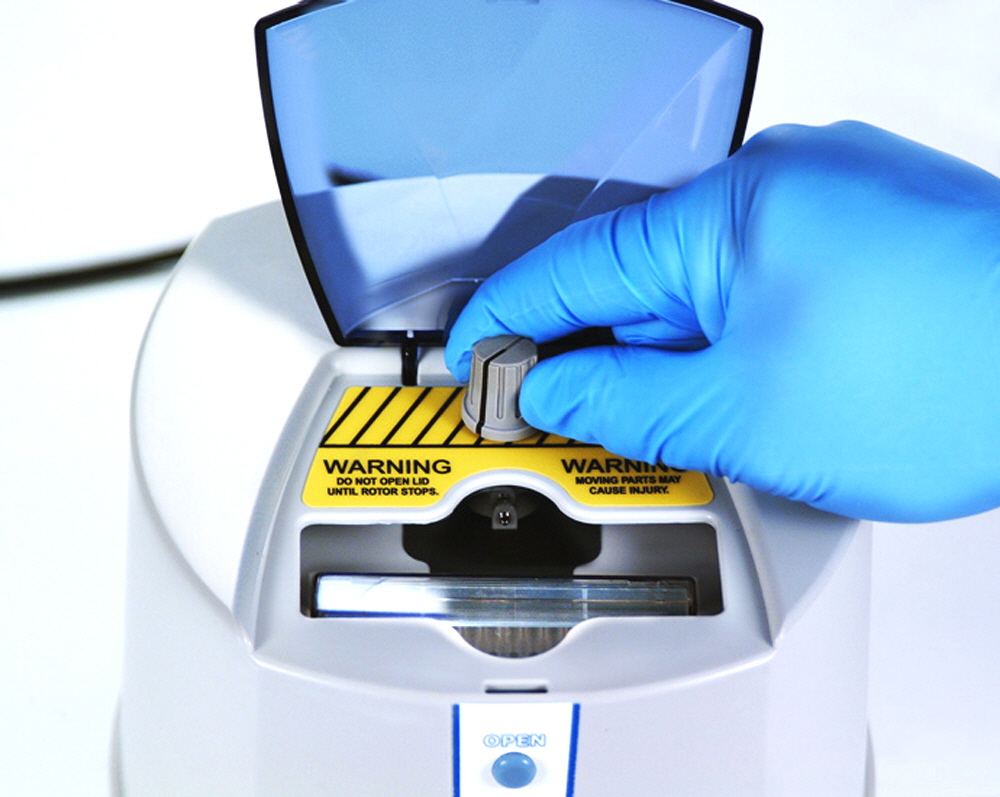
Figure 2. Arrayit Microarray Microplate Centrifuge (Cat. MPC110) instrument top view, with the blue translucent instrument lid in the open position and the thumb screw being used to rotate the rotor into the proper loading position.
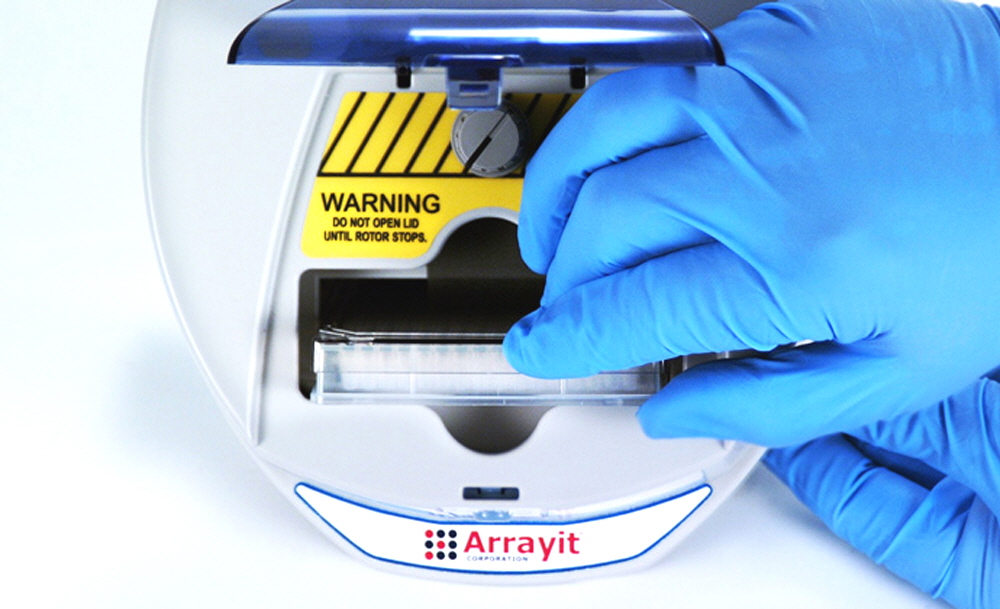
Figure 3. Arrayit Microarray Microplate Centrifuge (Cat. MPC110) instrument top view with the microplate loaded properly such that the lid faces inward and the well bottoms faces outward. A properly loaded microplate should rest below the top surface of the instrument case by approximately 0.5 cm.
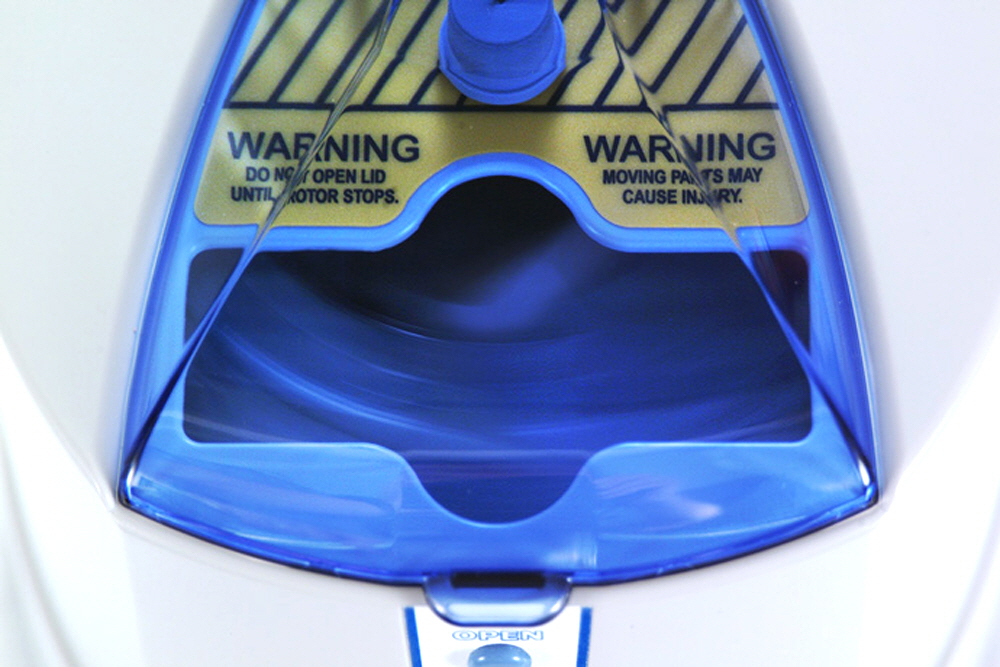
Figure 4. Arrayit Microarray Microplate Centrifuge (Cat. MPC110) high-speed centrifugation process viewed through the blue translucent instrument dome. These instruments reach top speeds of 5,000 rpms and represent a safety hazard if used improperly. Please do not open the blue dome until the rotor reached a complete stop.
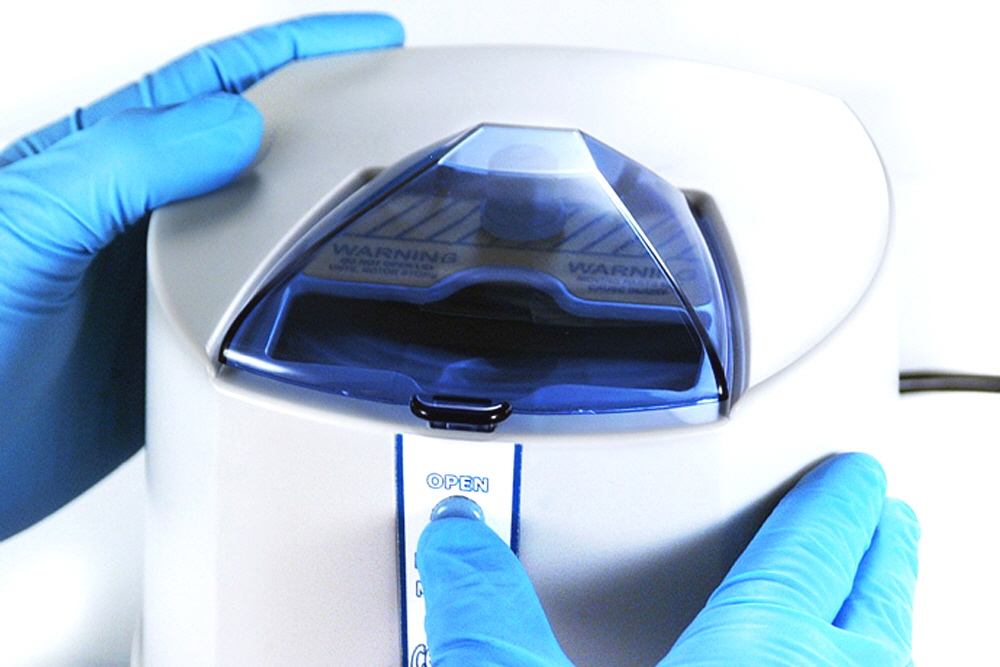
Figure 5. Arrayit Microarray Microplate Centrifuge (Cat. MPC110) centrifugation process is terminated by holding the back of the instrument and pressing inward on the “OPEN” button. Please wait until the rotor has reached a complete stop before opening the blue dome.
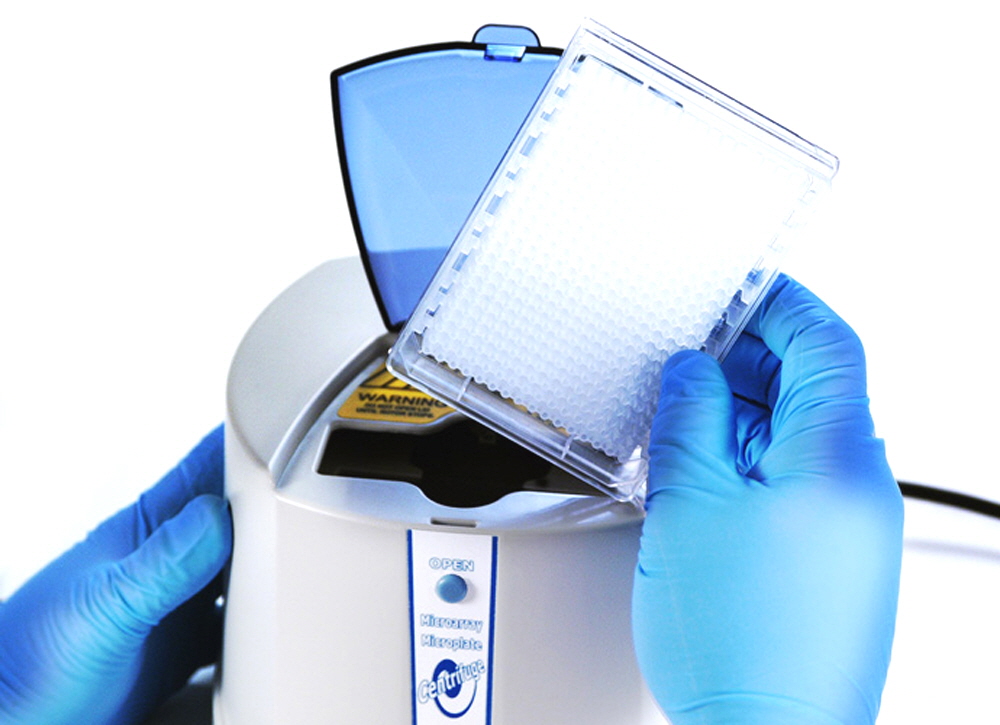
Figure 6. Arrayit Microarray Microplate Centrifuge (Cat. MPC110) microplates are removed from the rotor post-centrifugation by lifting the microplate upward and gently out of the instrument as shown.
Troubleshooting Tips
Instrument vibrates during use
- Make sure both microplates are loaded into rotor
- Make sure microplates are balanced in weight by ±0.5 grams
Instrument rotor does not spin
- Make sure power switch on back of instrument is turned to the “on” position
- Make sure the power cord is connected to the instrument and wall socket
- Make sure the plates, lids and seals reside below the instrument housing
- Make sure the transleucent blue dome is latched completely
Recommended Products
VIP™ Diagnostics Packages
NanoPrint™ LM60 and LM210 Enterprise Level Microarrayers
SpotBot® 3 Personal Microarrayers
InnoScan® Fluorescent Microarray Laser Scanners
SpotLight™ Personal Fluorescence Microarray Scanners
Arrayit Super Microarray Substrate Slides
Arrayit PCR Purification Kits
Arrayit 384-well microplates and lids
Arrayit microplate adhesive foil seals

