Colorimetric Scanners
Data Sheet
![]() Shop this product in our online store
Shop this product in our online store
The ArrayIt® SpotWare™ Colorimetric Microarray Scanner opens up a new facet of microarray technology. An excellent complement to your current fluorescence scanning technology, our Colorimetric system enables the use of alkaline phosphatase (AP) and horseradish peroxidase (HRP) labels. The SpotWare™ Colorimetric Microarray Scanner default accommodates 12 standard 25 x 76 microarray substrate slides, but can be easily programmed to handle different size scan areas. This system is for high-speed colorimetric scanning of chromatic detection of microarrays, western blots, microwestern arrays for research and diagnostic applications.
Table of Contents
- Introduction
- Quality Control
- Product Description
- Technical Assistance
- Easy Scan (Short Protocol)
- Easy Scan (Complete Protocol)
- Software Shareware
- Installation Guide
- Troubleshooting Tips
- Recommended Products
- Ordering Information
- Warranty
- Disclaimer
Introduction
Congratulations on taking a big step towards improving your microarray research. This booklet contains a complete set of protocols outlining the steps required to use the SpotWare™ Colorimetric Microarray Scanner.
Quality Control
Arrayit ensures the performance of these products, and the finest scientific research went into their development.
Product Description
The SpotWare™ Colorimetric Microarray Scanner is a high performance detection system at an incredibly affordable price. Users will appreciate the following system features:
- Ultra-sensitive CCD line scanning technology
- Adjustable scanning resolution: 5, 10, 20 and 50 µm
- Standard substrate format: 25 x 76 x 1 mm
- Easily programmed to handle different size substrates, plates, gels and blots
- Reads up to 12 microarrays using the 12-Position Substrate Slide Bay
- Standard 16-bit TIFF file format with 0-65,536 intensity values
- Rainbow palette data display for easy viewing
- Adjustable gain function provides an additional 3 logs (1000-fold) sensitivity
- Total dynamic range: > 7 logs (10,000,000-fold)
- Images importable into any standard microarray analysis software package
- Intuitive graphical user interface
- Operating system: Windows XP
- Small instrument size conserves bench space
- Broad spectrum white light source
- Compatible with alkaline phosphatase (AP) and horseradish peroxidase (HRP) labels
- Unique light path produces zero background with white membrane substrates
- Scan area: 25 x 76 mm with separate barcode detection capability
- Scan speed: 1.0 cm2 in 30 seconds at 10 µm resolution
- User-specified experimental notes attached to each data file
- Instrument size (L, W, H): 46 x 27 x 11.5 cm
- Instrument weight: 3.1 kg
- Total set up time less than 30 minutes
- Perfect complement to your existing fluorescent scanning system
- Reads DNA, RNA, protein, antigen, and antibody microarrays
- Perfect system for both research and diagnostics applications
Product Contents
- SpotWare™ Colorimetric Microarray Scanner (110V or 220V)
- SpotWare™ Power Supply with Voltage-Appropriate Cable
- SpotWare™ USB High-Speed Data Communications Cable
- SpotWare™ 12-Position Substrate Slide Bay
- SpotWare™ USB Software Key
- Computer with Pre-Installed SpotWare™ Controller and Image Acquisition Software
- Flat Panel Display with Video Cable and Voltage-Appropriate Power Cord
- Computer Keyboard
- Computer Mouse
- Computer Power Cord with Voltage-Appropriate Cable
Technical Assistance
Please contact us if you have any comments, suggestions, or if you need technical assistance. By electronic mail: arrayit@arrayit.com (under the subject heading, please type ArrayIt technical assistance). By telephone: (408) 744-1331, Monday–Friday PST 8:30am - 5:30 PM. Please remember that we want to hear about your successes!
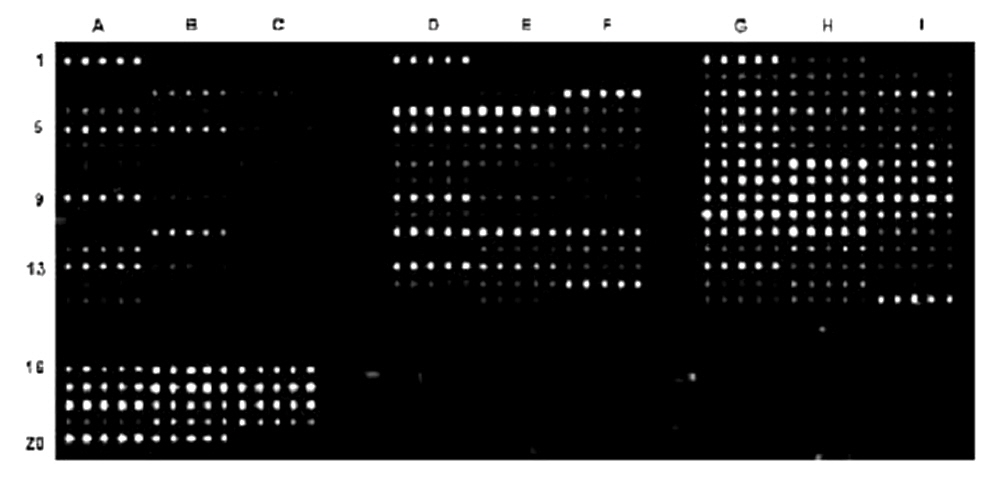
Figure 1. Protein microarray manufactured using the ArrayIt® Protein Microarray Platform and detected with the ArrayIt® SpotWare™ Colorimetric Microarray Scanner. Antibodies were diluted in 1X Protein Printing Buffer, printed in quintuplicate onto SuperProtein Substrates using a SpotBot® Personal Microarrayer, incubated with patient sera, stained with a secondary antibody conjugated to Alkaline Phosphatase (AP), and developed with an AP Developing Kit. Scans were performed at Gain setting 1.0 and 10 µm Resolution.
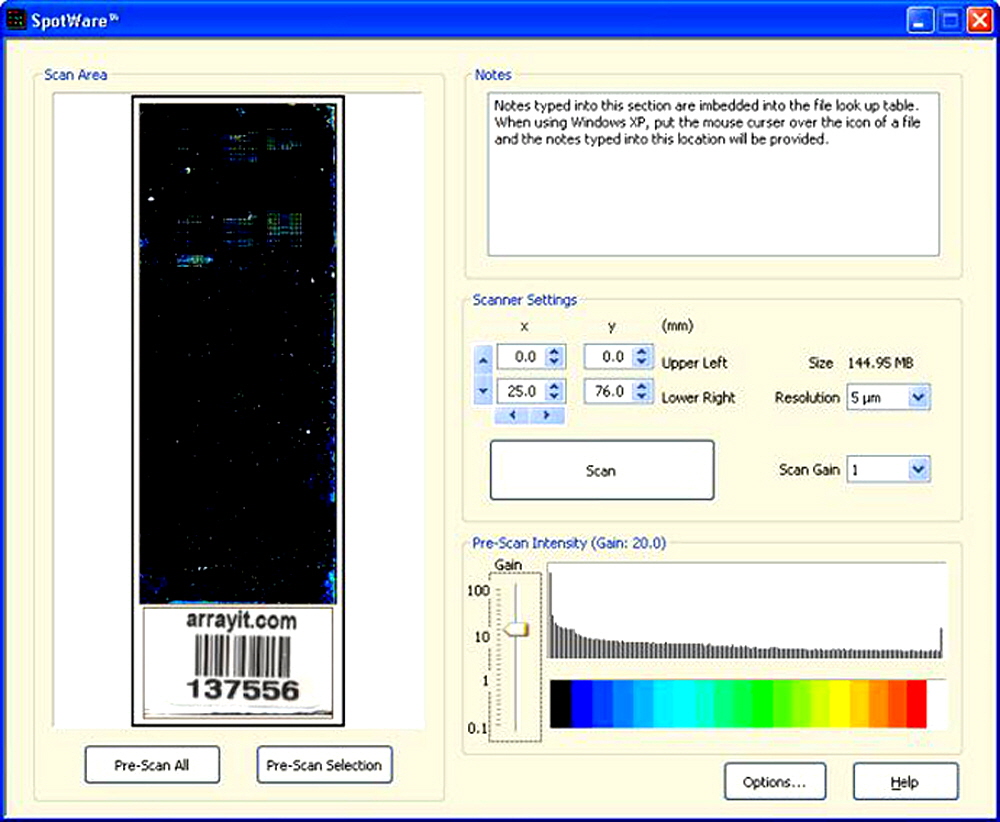
Figure 2. Shown is the main software window of the graphical user interface. The scanned substrate image (left) appears in the scan window and is coded to a rainbow palette for simplified viewing. The user can pre-scan the entire substrate or a specified area (bottom left). Users can enter experimental notes into a text window (top right). The scanner settings (middle right) include the scan area coordinates (x, y), file size (MB), scan resolution (µm), scan gain (0.1-100), and a Scan button. The pre-scan intensity window (bottom right) indicates the scan gains and an intensity histogram coded to a rainbow palette. A “screen shot” of the options window is shown in Figure 3. The data here were obtained using alkaline phosphatase (AP) labeling.
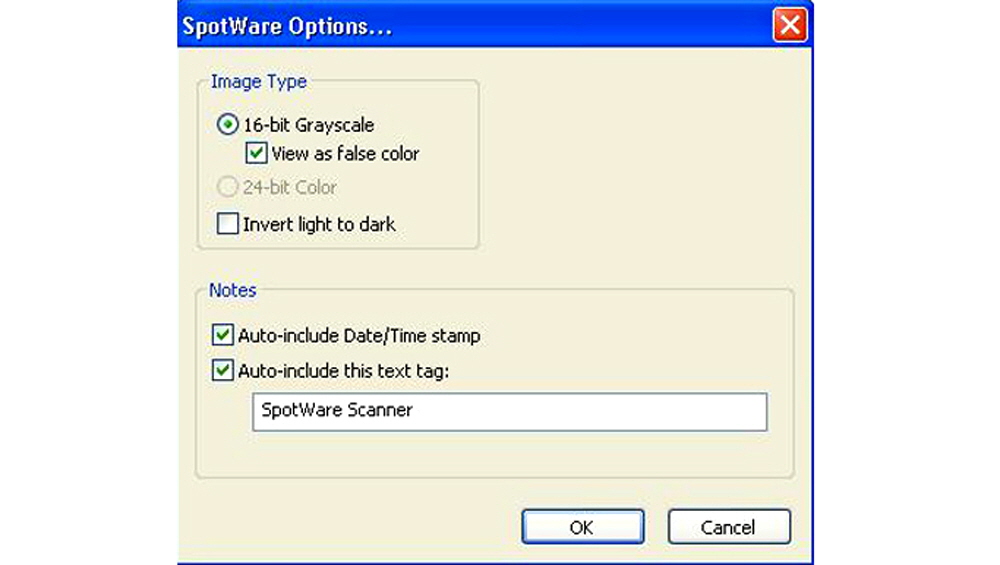
Figure 3. “Screen shot” of the options menu from Figure 2. The user may specify the image type as a standard 16-bit grayscale in standard black and white with the spots as light spots on a dark background (default standard in the microarray field), as a rainbow palette with intensities coded to different colors, or as an inverted black and white image with the spots appearing as dark spots on a light background. Notes typed into this section such as “SpotWare Scanner” and other information is stored with each TIFF.
Easy Scan (Short Protocol)
1. Install software and hardware (see Installation Guide).
2. Open the SpotWare™ software by double-clicking the desktop icon.
3. Place a colorimetric microarray spots down in the upper right corner of the scanner template.
4. Click “Pre-Scan All” to perform a quick scan of the entire microarray.
5. Mouse out an area and click “Pre-Scan Selection” to pre-scan a defined region.
6. Set desired Scan Gain and Resolution using the drop down menus.
7. Enter user comments in the “Notes” text window.
8. Click the “Scan” button to scan at the designated Gain and Resolution.
9. Click “Save” to save the image or “Discard” to start again.
Easy Scan (Complete Protocol)
1. Install software and hardware (see Installation Guide). The basic steps are as follows. Remove the SpotWare™ Colorimetric Microarray Scanner from the box and place it on the desk or laboratory bench. Make certain to unlock the transportation lock on the back of the instrument (see Fig. 7). Insert the AC power adapter and USB instrument cable into the computer and scanner. Insert the USB key into a USB port on the computer. Install the software.
2. Open the SpotWare™ software by double-clicking the desktop icon. Double click on the icon that is automatically generated on the desktop after installation of the software and drivers. The intuitive SpotWare™ graphical user interface (GUI) will appear on the desktop as shown in Fig. 2. Familiarize yourself with the software settings.
3. Place an alkaline phosphatase (AP) or horseradish peroxidase (HRP) colorimetric microarray in the upper right corner of the scanner template (spots facing down). Lift the scanner lid and place the microarray substrate directly against the glass surface of the scanner deck. If you are using Arrayit substrates with chamfered corners, the chamfer should be positioned in the upper left corner of the substrate locator template directly against the flat top edge of the template. Make sure the glass deck of the scanner is clean and free of fingerprints and dust. Microarray Cleanroom Gloves should be used at all times when handling and scanning microarrays. The substrate locator template can be lifted off the deck for cleaning if necessary. If removed, make certain to replace the template in the correct orientation, with the flat sides facing upward and the finger holes facing downward.
4. Click “Pre-Scan All” to perform a quick scan of the entire microarray. With the colorimetric microarray facing downward on the glass scanner deck, click the “Pre-Scan All” icon to perform a quick scan of the entire microarray. The Pre-Scan mode will produce a low-resolution (50 µm) image of the entire microarray in approximately 10 seconds, and the image will appear in the Scan Area window. The Pre-Scan image allows the user to rapidly locate the signal areas and set the scan Gain to the correct sensitivity. The maximum scan area is 25 x 76 mm, sufficient to cover the entire surface of a standard 1 x 3” substrate.
5. Mouse out an area and click “Pre-Scan Selection” to scan a defined region. Using the Pre-Scan image as a guide, use the computer mouse to define a sub-region corresponding to the printed microarray, and press the “Pre-Scan Selection” to generate a pre-scan image of the selected region. The enlarged image will appear in the scan window. Using the computer mouse, adjust the Pre-Scan Intensity bar from 0.1 to 100 to adjust the scan gain and produce greater or lesser sensitivity. Adjusting the Intensity bar will change the appearance of the image, but not the true scanner sensitivity. Use the Intensity bar to determine the desired scanner sensitivity, and use the Scan Gain (see #6) to adjust the true instrument sensitivity prior to acquiring a high-resolution image with the “Scan” button.
6. Set desired Scan Gain and Resolution using the drop down menus. Using the computer mouse, adjust the Scan Gain and Resolution settings on the right side of the “Scanner Settings”. For most applications, the Gain should be adjusted so that the most intense microarray spots produce nearly saturated values, and all other spots produce sub-saturating signals. The Gain can also be set at a very high setting to detect faint signals, though intense spots will be outside the linear range at these settings. The histogram to the right of the Gain bar (lower right) can be used to determine the intensity distribution of signals on the microarray and to select the desired Gain. The histogram tallies all of the pixel intensities in the image and codes them to a rainbow palette below the histogram, with white and black signals representing the strongest (e.g. 65,536) and weakest (e.g. 0) signals, respectively. The Scan Gain setting in the drop down menu determines the final scanning sensitivity. Changing the “Pre-Scan Intensity” using the vertical Gain bar changes the APPEARANCE of the Pre-Scanned image, but NOT the final image obtained when using the “Scan” button. For example, if the Pre-Scan Intensity shows a value of 7 and the Scan Gain shows 1, a Scan Gain value of 1 will be used to acquire the final image. With respect to Resolution, be certain to use a setting compatible with the spot diameter or feature size. Resolution can be set at 5, 10, 20 or 50 µm settings, and a good guide is to use a resolution setting that gives 10 pixels per spot diameter such that 500, 200, 100 and 50 µm spots would use 50, 20, 10 and 5 µm resolution settings, respectively. Remember that a 2-fold increase in resolution produces a 4-fold increase file size (MB). Scan resolution should be used carefully to prevent the accumulation of excessively large files.
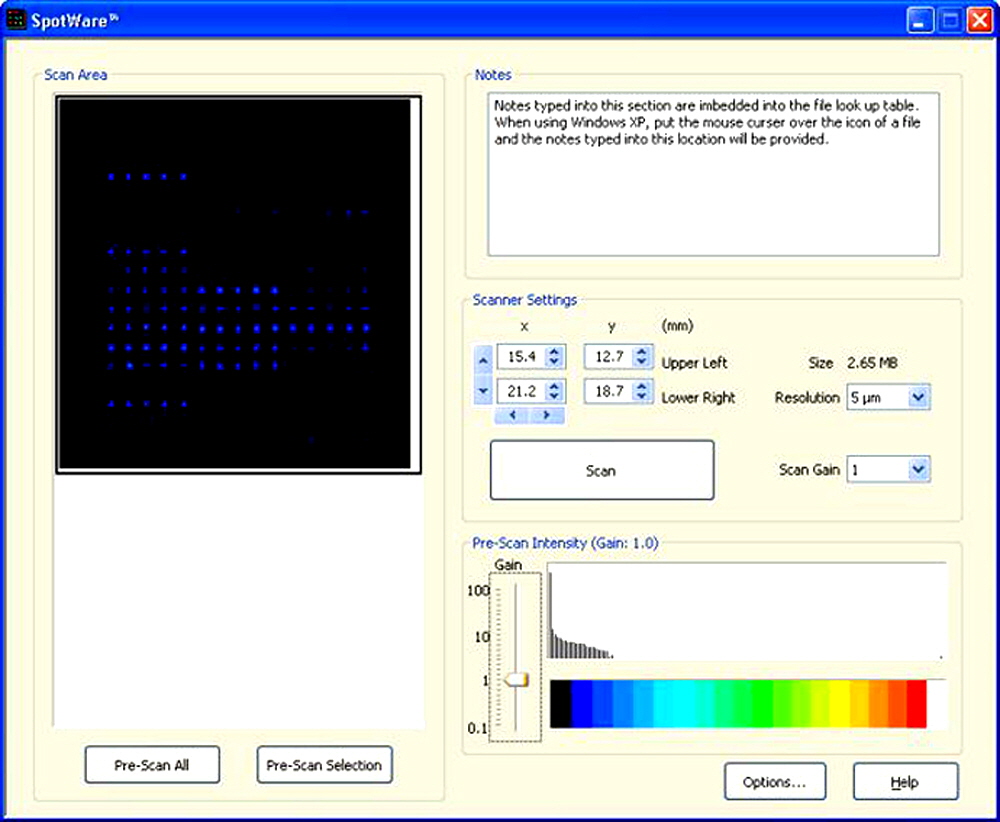
Figure 4. A “screen shot” of the SpotWare™ software, showing an alkaline phosphatase (AP) colorimetric microarray image acquired using the “Pre-Scan Selection” at Intensity Gain 1.0.
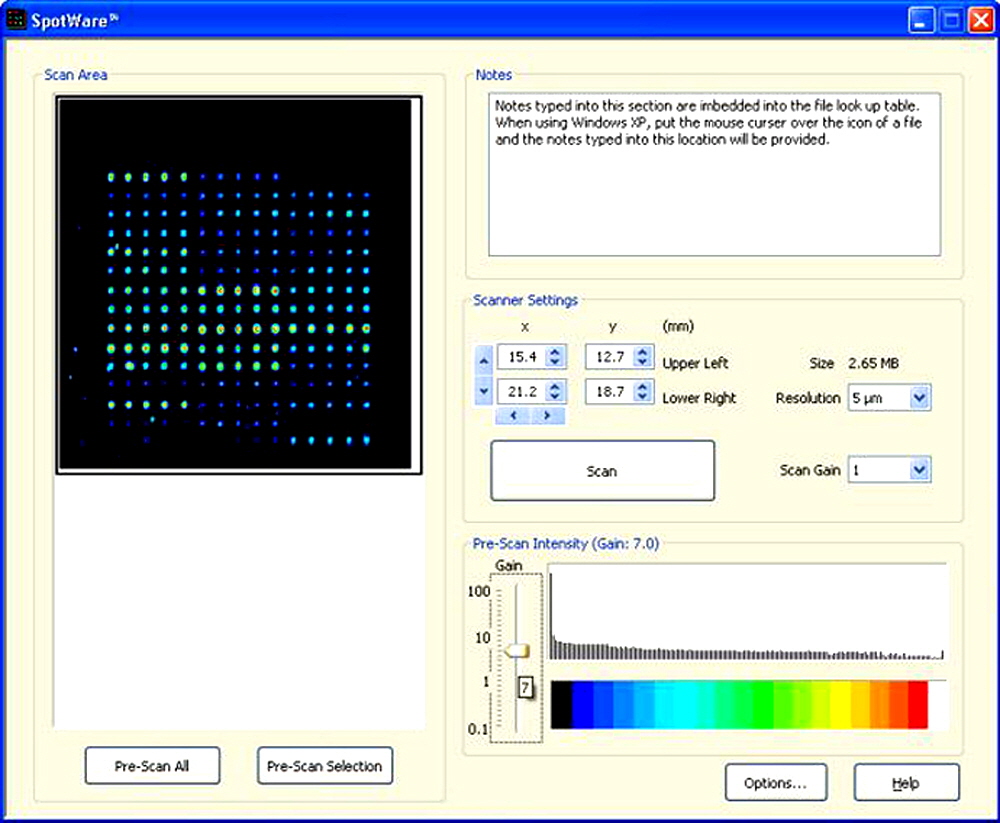
Figure 5. A “screen shot” showing the same Pre-Scan Selection as in Figure 4, but at Scan Gain 7.0. The increase in signal intensity is clearly visible, though the background noise remains low. The Arrayit Alkaline Phosphatase (AP) Kit (Cat. APK) was used to develop this microarray.
7. Enter user comments in the “Notes” text window. This text window allows users to enter experimental notes of interest including types of elements and probes, hybridization and reaction conditions, labeling procedures, manufacturing details, clinical data, and other experimental parameters. Notes typed into this window are saved and imbedded in the file look up table after the scan is completed and saved. To access the Notes in a saved file, place the mouse curser over the file icon and the notes will appear.
8. Click the “Scan” button to scan at the designated Gain and Resolution. Prior to scanning, be certain to type the experimental details into the “Notes” text window, and make certain that the Resolution and Scan Gain are set as desired. The portion of the microarray selected for scanning is indicated as X and Y coordinates on the left side of the “Scanner Settings” section. A particular scan area can also be selected using the toggle buttons on the right side of each the four X and Y coordinate boxes. Scanning proceeds at a rate of 1.0 cm2 per 30 seconds at a resolution of 10 µm. The entire 25 x 76 mm substrate can be scanned in 170 seconds at a resolution of 10 µm. Please note that a 2-fold increase in Resolution produces a 4-fold increase in scan time. A scan at 5-µm resolution of a 1.0-cm2 area requires 2 min (compared to 30 sec for the 10 µm setting).
9. Click “Save” to save the image or “Discard” to start again. Once an image is scanned a new graphic appears on the screen as shown in Fig. 6. Click “Save” if you wish to save the image or “Discard” to dispose of the images and start again. Images are saved in standard 16-bit Tagged Image File Format (TIFF), and can be imported into any standard microarray quantitation software package. Bar code and Pre-Scan image data are also saved with each TIFF. The Scanned image files also include all of the hardware settings used to acquire the image including scan area coordinates, resolution, gain, and other settings. Some image analysis packages such as ImageJ http://rsb.info.nih.gov/ij/ to display all three images when opening a SpotWare™ file, though most microarray quantitation packages open only the high-resolution TIFF.
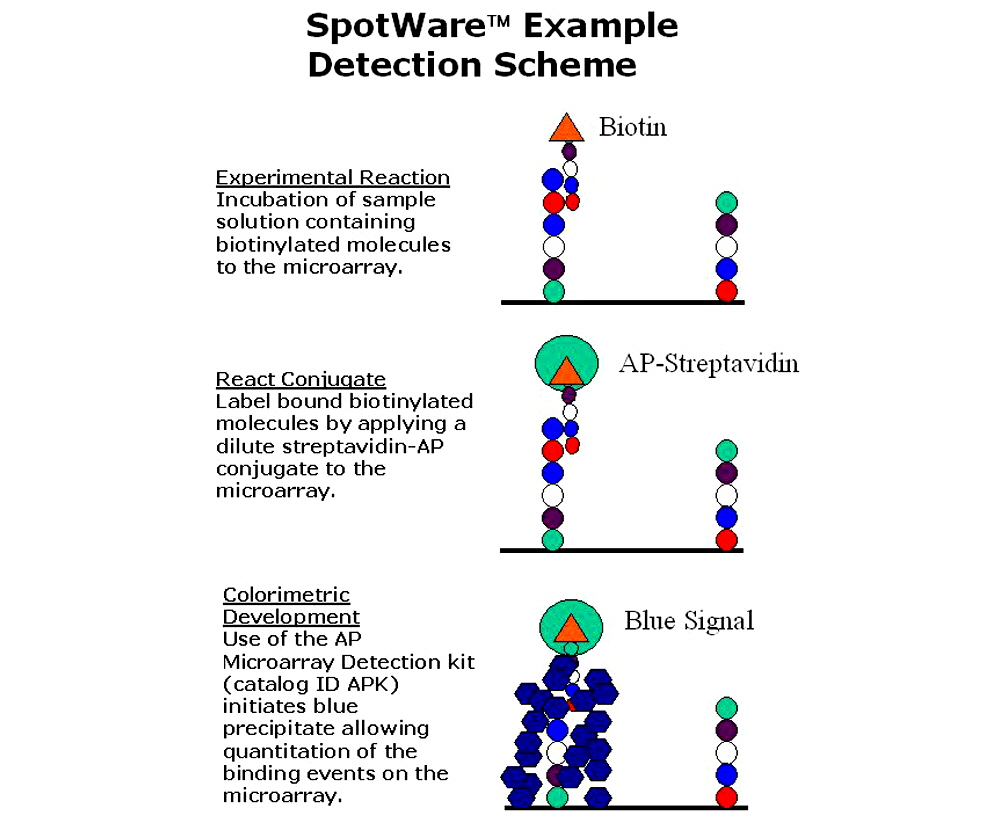
Figure 6. Streptavidin conjugated to alkaline phosphatase is detected using the ArrayIt® brand APK microarray detection kit.
Setting up a new template scan area
Contact arrayit@arrayit.com and tell us the size and shape of your scan area. We can design and manufacture the physical template and provide all the programming. If you are already a SpotWare end user and in a hurry to scan a new size “slide” or substrate, plate or gel, follow these directions.
We recommend copying the "Default.spx" file in the Template directory to a second name, and then editing that second file. That way, the Default file never gets corrupted. In the SpotWare options, we added an item to allow you to specify your own custom template file name, so you don't have to edit the "Default" file.
There are three sections in the custom template file that need to be changed to create a new template. All measurements are in tenths of a millimeter (i.e., 1mm = 10).
1) The first is the "Slide Definition". This defines the areas and dimensions of the slide or chip, mebrane, palte or whatever else you plan to use.
1.a) Give the slide definition a short, descriptive name (name = ), and specify overall width/height of the slide (Size w= h=) Example:size of a microwestern array could be w="800" h="1100" (i.e., 80x110mm).
1.b) Define the Scan Regions within the slide. Originally, we defined a "label" region, and a "sample" region. We recommend leaving a .5mm (5 tenths) boarder at the edges of the chip. If there will be no barcode or label, and the entire slide should be used, you only need to define a sample area region. For example, for this new 8cm x 11cm scan area, if no label area, then remove the "label"
ScanRegion block, and change the "sample_area" ScanRegion definition to:
Offset x= "5" y= "5"
Size w= "790" h= "1090"
(staying with this example, this defines the entire 8cm x 11cm slide area, minus a 5/10ths mm boarder at the edges, to be detection scan area).
2) The second change is the "Alias" to use when referring to the new slide layout.
2.a) Change the "Alias" definition so that provides an alias for your new slide layout name. "name=" is whatever alias you want to give it, "definition="should refer to the "name" you gave your new slide definition in the first step.
3) The third/final area of change is the actual Bay "TemplateLayout" itself.
3.a) Change the overall size of the plastic Bay template if needed, otherwise, the existing values (which are the full size of the scanner glass) are probably ok.
3.b) Set the locations of each "SlideBay". If you only can fit 4, then just use entries 1..4. Measure how far it is from the top and right edges of the plastic bay template to the *top-right" corner of each slide bay opening, and use those measurements as the "x" and "y" Offset of each slide bay. Again, those measurements will be in tenths of a mm. Change the "Layout" slide=whatever alias you gave to your slide definition.
Software for Microarray Image Analysis
ImageJ http://rsb.info.nih.gov/ij/ Some microarray analysis software programs have specific lookup tables for their tif files, Image J can be used to make the 16-bit tif files generated by SpotWare compatible with certain programs.
Agscan Microarray Quantification Software: http://www.sigenae.org/fileadmin/Sigenae/Documentation/Using_AGScan.pdf Provides the microarray community with a open platform used to process microarray images. Additionally to be used by the image processing community to implement new algorithms for automatic grid positioning and spot quantification. The new version is now fully multi channel.
TM4 TM4 is a suite of open source software tools that manage and analyze data from microarray experiments.
ProMAT ( http://www.pnl.gov/statistics/ProMAT/ )takes microarray data (the output of microarray image analysis such as Mapix, Imagene or Agscan) where some arrays are treated with standards of known antigen concentration and some arrays are treated with samples of unknown concentration. ProMAT fits standard curves to the standards data to relate spot fluorescence to concentration. ProMAT also calculates and outputs confidence bounds on these standard curves. The tool then uses the standard curves to predict antigen concentrations for the unknown samples, along with prediction intervals.
BRB ArrayTools. BRB-ArrayTools assist in the analysis of microarray data and was developed by professional statisticians with extensive experience in the design and analysis of microarrays. Implemented as an Excel add-in, BRB-ArrayTools provides a user-friendly interface and a flexible data import function suitable for a range of formats. The program can be used for non-commercial purposes free-of-charge. Learn more about the features associated with BRB-ArrayTools at the following site: http://linus.nci.nih.gov/BRB-ArrayTools.html
Cluster and TreeView. Cluster and TreeView are an integrated set of programs for analyzing and visualizing the results of complex microarray experiments, written by Michael Eisen: http://rana.lbl.gov/EisenSoftware.htm.
Jexpress. J-Express is a java application for the analysis of gene expression data from microarray experiments. It is programmed for the java runtime environment 1.2, which is available for most operating systems. Bjarte Dysvik and Inge Jonassen of the bioinformatics research group at the Department of Informatics at UoB developed J-Express: http://www.ii.uib.no/~bjarted/jexpress/
ArrayQuest enables browser-based implementation of DNA microarray data analysis programs that can be executed on a Linux-based platform. Importantly, ArrayQuest is a platform that will facilitate the distribution and implementation of new analysis algorithms and is therefore of use to both developers of analysis applications as well as users. ArrayQuest is freely available for use at http://proteogenomics.musc.edu/arrayquest.html
Installation Guide
Click here to view the installation guide.

Figure 7. Shown is a 125-µm microarray spot scanned at different Resolution settings.A microarray was manufactured on a SuperProtein hydrophobic membrane coated substrate using SMP4 pins and a SpotBot®. The microarray was processed and the protein spots were developed using the Alkaline Phosphatase (AP) Kit. The AP spots were scanned four successive times with the SpotWare™ Colorimetric Microarray Scanner operating at 5, 10, 20 and 50 µm Resolution, respectively. The TIFF files of the 125-µm spot (panels from left to right) clearly reveal the different scan Resolutions.
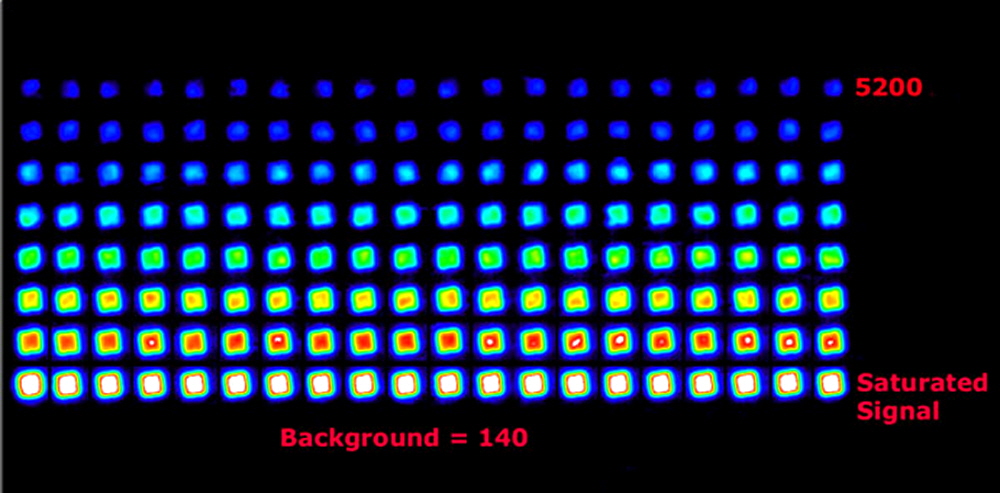
Figure 8. SpotWare™ scan at 5 µm resolution showing the quantitative capacity and excellent signal to noise ratio of the system. The 16-bit TIFF data are presented in rainbow pallet for ease of viewing.
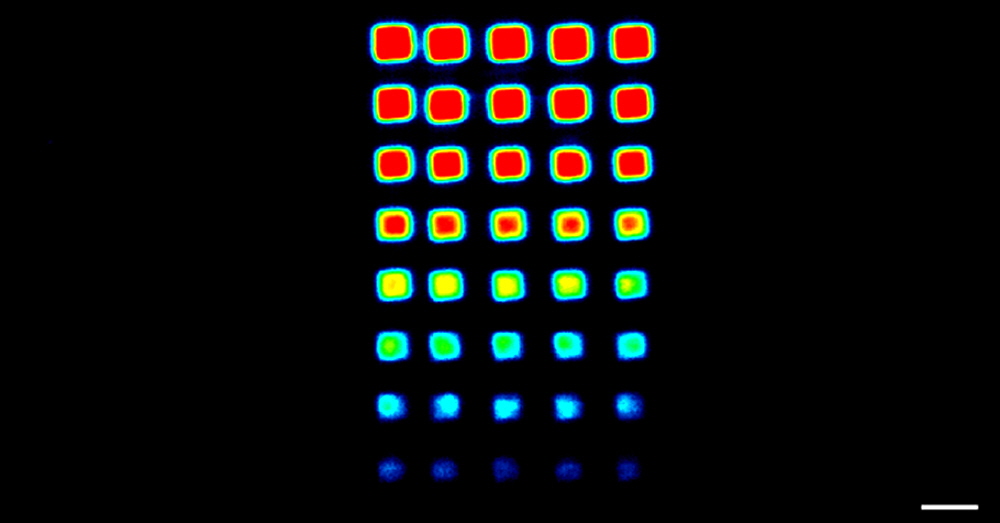
Figure 9. SpotWare™ Calibration Substrate Slide data. Shown is a 5 µm scan at gain setting 5 of the printed region of the SpotWare™ Calibration Substrate Slide (Cat. SWC). The 16-bit TIFF rainbow palette data correspond to a 2-fold dilution series (256-fold total dilution) of eight samples printed in quintuplicate. Space bar = 300 µm.
Troubleshooting Tips
1. Insufficient image intensity
- Increase the scanner Gain
2. Excessive file size
- Decrease the scanner Resolution
3. Software fails to operate
- Make sure the purple USB key is inserted into the computer USB port
4. Software aborts
- Do not adjust the Pre-Scan Intensity until the Pre-Scan image appears
Scientific Publications
Click on the links to view recent scientific publications featuring ArrayIt® brand microarray products for colorimetric microarray experimentation.
Recommended Products
NanoPrint™ 2 Microarrayers
NanoPrint™ 2 Protein Edition Microarrayers
SpotBot® Extreme and Protein Edition Microarrayers
SpotBot® Titan and Protein Edition Microarrayers
SpotBot® 4 Personal and Protein Microarrayers
MAPIX® Microarray Quantification Software
SuperNitro Microarray Substrates
SuperProtein Microarray Substrates
Protein Printing Buffer
BlockIt™ Microarray Blocking Buffer
SuperProtein Blocking Buffer
PCR Purification Kits
ArrayIt® Green and Red Reactive Fluorescent Dyes
Microarray High-Speed Centrifuge
High-Throughput Wash Stations
Microarray Hybridization Cassettes
